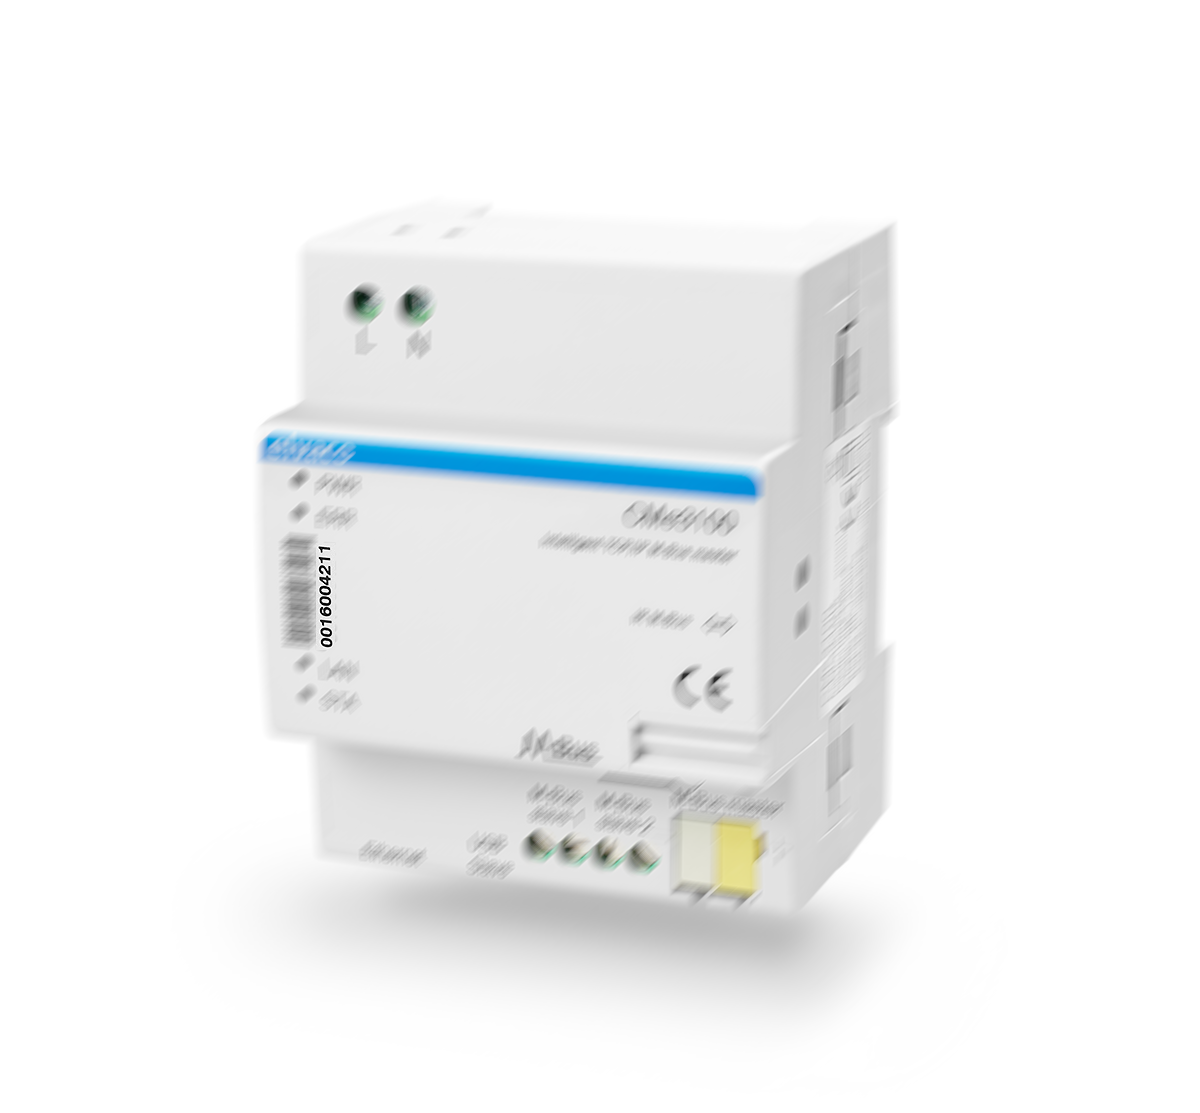
Concentrator wiring
The wiring of the MBus master Elvaco CMe3100 is as follows:
-
Connect the power supply to terminals L and N - standard via a 10A circuit breaker - type C characteristics.
-
Connect the MBus to the terminals marked M-Bus master.
-
Finally, connect a network cable with RJ45 Cat5e or later generation terminals to the port marked Ethernet - if properly connected to the network, the yellow LED marked LAN will light up and the red LED marked ERR will light up when the IP address of the CMe3100 concentrator is assigned in a 50/50 ratio.
Installation and commissioning
The CMe3100 concentrator is set up via the web interface. The procedure is as follows:
-
Connect the concentrator to your PC using a USB cable with a type B connector - connect this to the port marked USB slave - the other connector to a free port on your PC.
-
Wait for the necessary drivers to be installed on your PC. This operation takes approximately one minute.
-
The installation file SETUP.exe can be found in Computer -> Removable Disk (in our case E:). Run this file and step through the installation.
-
After the installation is complete, the elvaco web interface will automatically open in your browser. If nothing happens, open the web interface manually via the newly created shortcut on the Configure CMe3100 desktop.
-
Log in with your default login credentials:
| Username | Password | admin | admin |
- You will be prompted to change your password immediately after logging in. You will then always log in to the concentrator with this new password and the same username: admin
Navigating the Elvaco web environment
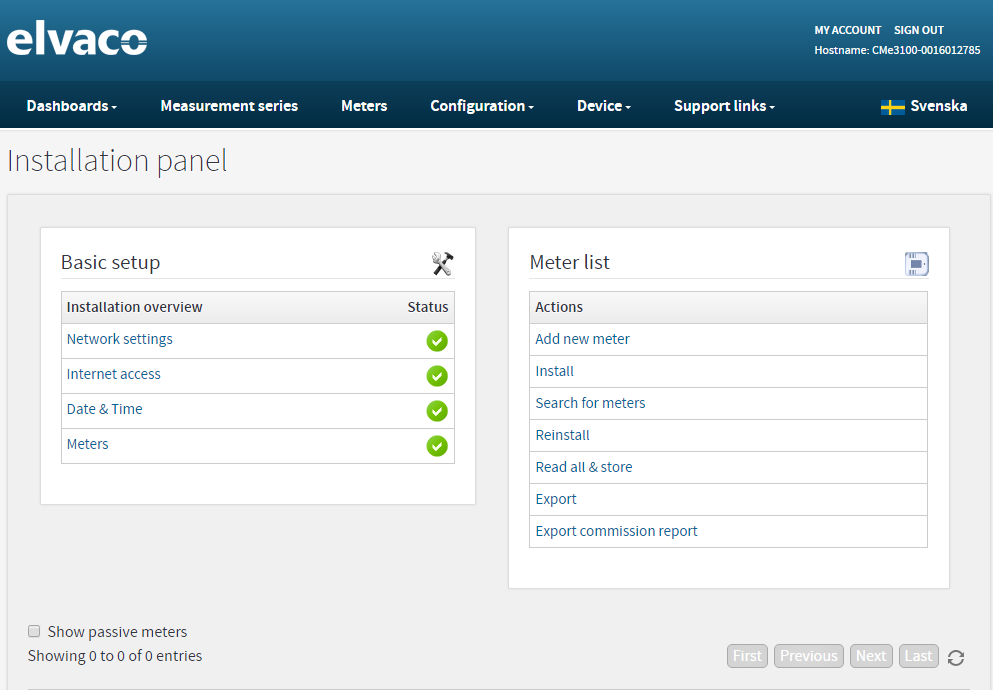
The first thing you will see when you log in is the installation panel - Installation panel - from this page you can easily set up all the basic settings.
One of the fields is called Basic setup. Here you can see the current state of the concentrator. The individual items mean the following:
-
Network settings shows if the internet connection is set up correctly.
-
Internet access: reports if an internet connection is available.
-
Date & Time indicates if the time is set correctly.
-
Meters reports relevant errors in the meter configuration.
Time setting
-
First you need to set the time on the concentrator. In the Basic setup box, click on Date & Time.
-
The date and time section shows the automatically generated time. Make sure it matches today’s date.
-
Set the Synchronization settings section as follows:
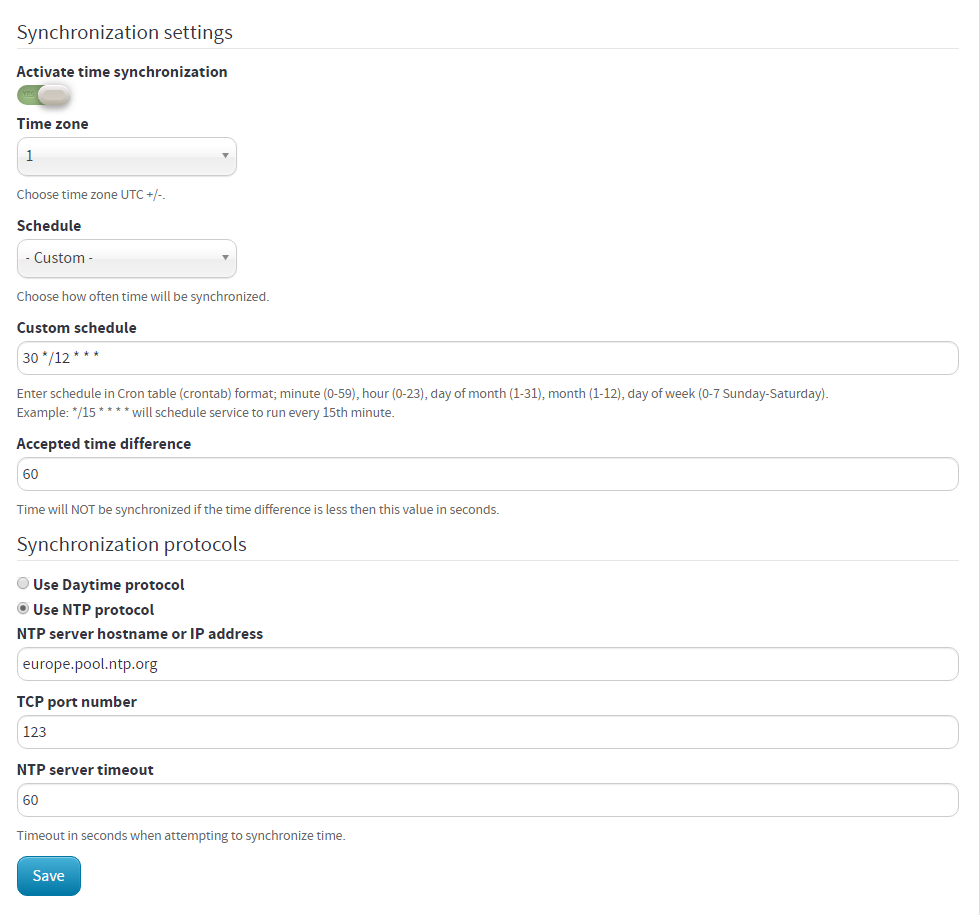
*Save the settings by clicking Save.
Message log settings
-
In the main bar at the top, select the Configuration -> Push reports tab.
-
In the Scheduled reports section, enable Report 1 and click on it.
-
Fill it in according to the template:
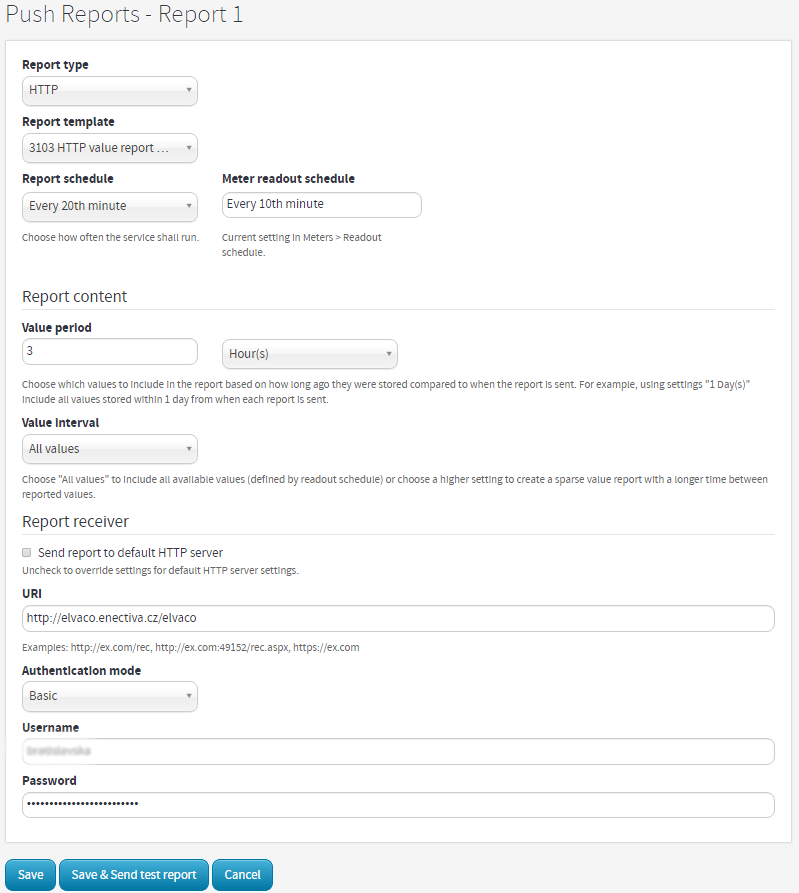
-
At the end, choose your own username and password to connect to the concentrator in Enetiva.
-
Save by clicking Save.
Configuring meters
- In the main bar at the top, select the Meters tab.
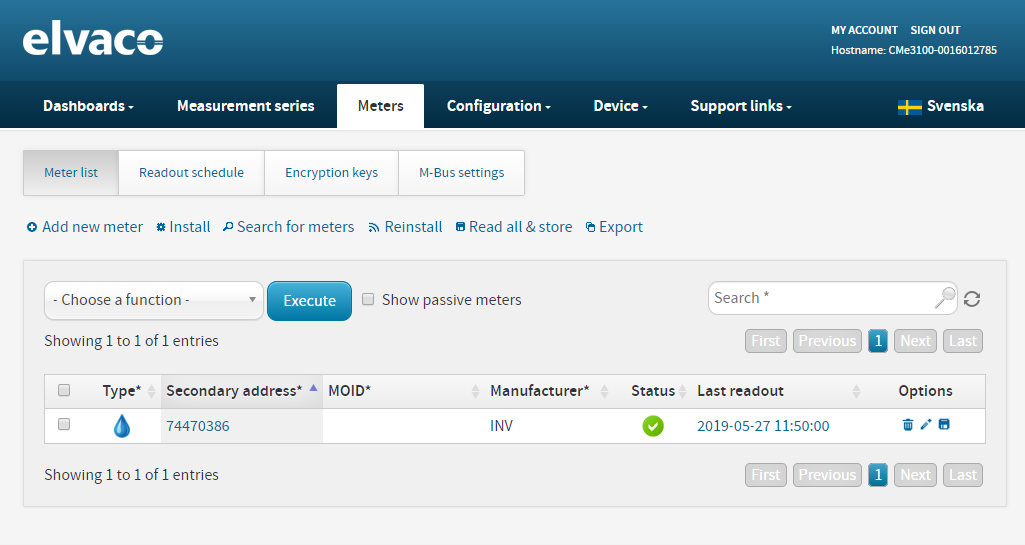
There are several ways you can set up connected meters on the M-Bus. The most convenient way to add meters is by using the automatic search. Click on Search for meters in the Meter list tab. You can now choose from three options:
*The easiest way to add meters to the concentrator is via a search for secondary addresses (i.e., serial numbers). Click Start Secondary Search. This operation can take up to 20 minutes, however it is the easiest.
- If you want to connect the meters wirelessly, you need a CMeX50 - M-Bus Receiver. and individual meters with wM-Bus wireless receivers. Then you simply add the gauges via Start Wireless Search.
*The last way to find all the meters is by using the primary address. This address must be manually assigned to each meter and is a number between 0 - 255.
Concentrator settings in Enetiva
In order for the automatic import of data into Enetiva to occur, you must create an automatic configuration in Enetiva. The customer management environment, called Meta, is used for this.
-
Go to www.meta.enectiva.cz
-
Log in and under your partner name you will find your customer name.
-
In the right part of the same row, click on the third icon from the left - Customer Import Settings.

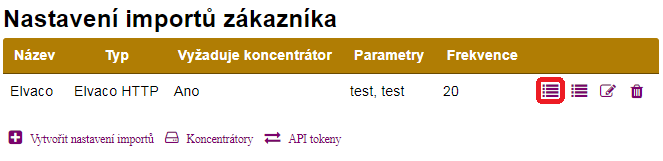
Clicking on this icon will take you to the import settings section. Here you need to set the following 3 items:
Customer Import Settings
-
Click on the first icon from the bottom left - Create Import Settings.
-
Select Elvaco HTTP as the type.
-
Name your import whatever you want.
-
In the Parameters, type the username and password in the form "username password" - without quotes, separated by a space as you filled it in the message log settings in the Elvaco interface. These credentials must be the same!
-
Leave the frequency set to the default value - every 20 minutes.
If you would be adding another concentrator from the same brand, you can use the import settings already created, you do not need to create a new one.
Concentrators
*In the Customer Import Settings section, click the second icon from the bottom left - Concentrators.
-
Now click the first icon from the bottom left - Create Concentrator.
-
Select Elvaco as the type.
-
Name your concentrator.
-
Copy the serial number from the concentrator - you will find it next to the barcode (see picture).
-
Select LAN as the connection type.
-
You can add your own notes, finally click Save.
Configuring meter imports
You can now assign readings imports to the individual meters you have created in Enetiva.
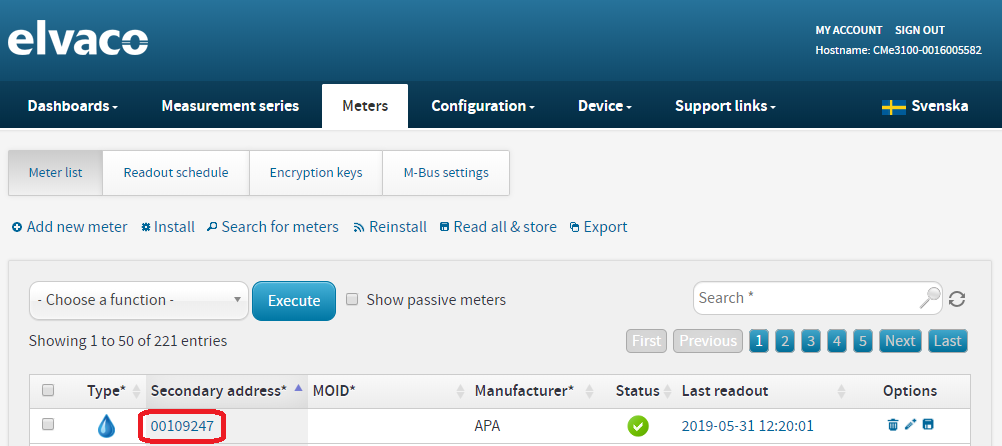
- In Enetiva, on the Gauges tab, click on the gauge to which you want to add an import. At the bottom, select your import as the Import Data Source, and in the Import Meter ID box, type the serial number of the meter, which you can find on the meter or in Elvac, where it is displayed on the Meters -> Secondary address tab. Leave the Import Frequency at 10 minutes.
Now you need to set the correct parameter for each meter back in Meta.
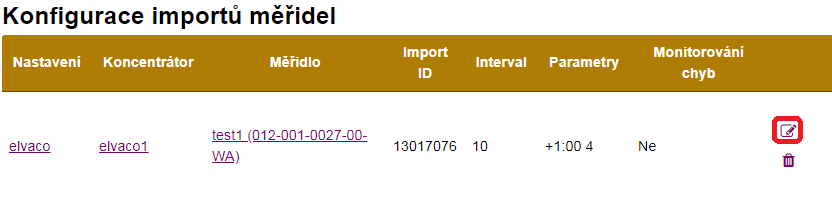
- From the Customer Import Settings section, click the first icon in the middle left - Meter Import Configuration. Here you can see all the gauges that have the import configuration checked in Enetiva.
- Click Edit.
-
Add your concentrator - by the name you filled in for the concentrator settings.
-
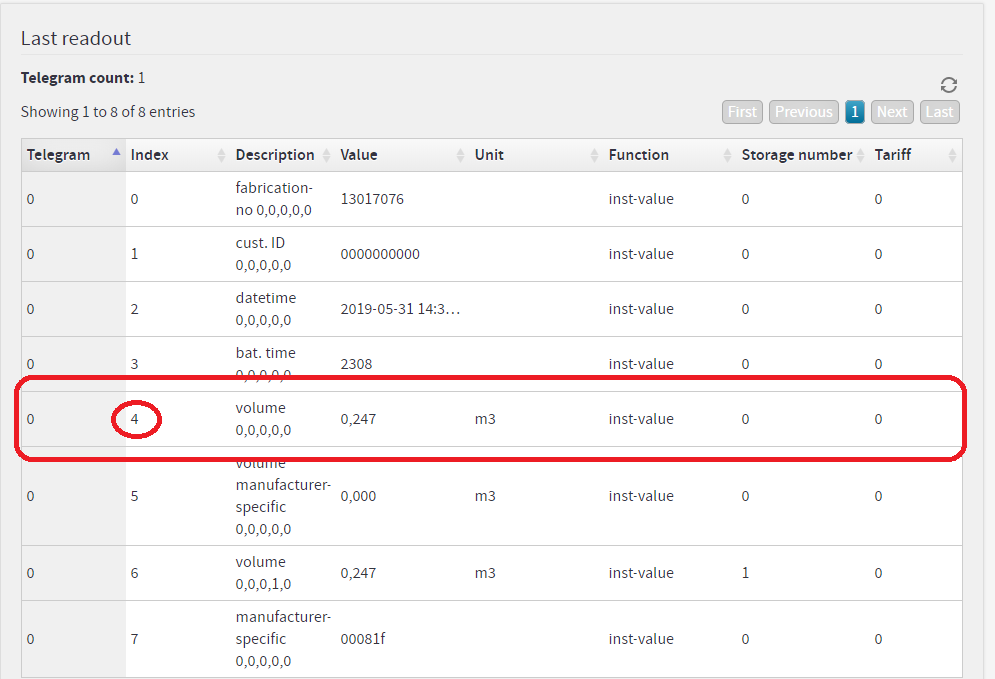
In the Parameters you have to list the index under which the concentrator meter sends the desired value in the datagram (volume for water and gas meters, energy for electricity and calorimeters). This parameter can be found in the Elvaco interface when you click on the meter. Below you will find a table with all the indices and their specifications as given by the meter manufacturer. For our manufacturer, the volume is in the 4th position. So in our case, we write in the parameters: “+01:00 4” - always write +01:00 there - you may notice that it is a time value. It is used to set the time zone the concentrator works with. The factory settings from the manufacturer have it set to GMT+0, we need GMT+1, that’s why we add an extra hour. The second parameter value indicates the position where the measurements are located, as we have already discussed.
- Save by clicking Save.
You should now see the incoming readings in Enetiva. The period of incoming messages to Enetiva is set to 20 minutes, so if you don’t see anything yet, wait for the next message.